This should be in every affiliate marketing 101 program, but it isn’t. I went through a few courses. The courses taught me how to find good affiliate programs, lead generation, and sales funnels. Good stuff, but how about some basics?
I live by the motto “work smarter, not harder” and this is one of those simple steps that saves you time and stress. It is to use redirects on your affiliate links.
When you get your first affiliate link. Stop and think.
Will you remember everywhere you put that link? It could be in:
- Blog posts and post comments
- Landing pages
- Social media posts and comments
- YouTube video descriptions and comments
- Profile link lists
- Texts and chats
Can you even change the link in every place you put it if that link changes later on?
You can try to track all this and update every link location manually if a link needs updating. BUT there is an easier way.
What is a Link Redirect?
A redirect is when one URL redirects to another URL. If a user clicks on URL A, they’ll end up at URL B.
Here’s an example:
My Affiliate Link: https://pages.helium10.com/aff-freedom-ticket?crsh_reqid=3837741
My Redirect Link: https://www.alderandjade.com/go/H10Freedom
Both links go to the same final URL.
Why Use Link Redirects?
There are 4 powerful reasons why you should use link redirection.
#4 Prevent Getting Banned
Many social platforms do not allow direct affiliate marketing links. Their systems can look for obvious affiliate link URLs. Your account can get suspended, shadow banned, or worse. To avoid this, cloak your links using a redirect or bury them in a sales funnel.
#3 Looks More Polished
You’ve seen those ugly affiliate link URLs. Even the customizable ones aren’t great. By using a URL redirect, you can shorten the URL to something clean and simple. It makes your link appear more trustworthy and can be more memorable.
#2 Prevent Broken or Outdated Links
There are many reasons why affiliate links change over time:
- It is a limited-time offer
- There is a special link for an affiliate challenge
- The affiliate program changed their platform and all links
- The affiliate program recommends using an updated link
- The affiliate program ended or closed your account
It is nearly impossible to remember all the places you put a link. How many times did you put it in your blog? Social media? Landing pages? Random chats and text messages? Do you have the time to track and correct all those if the link changes? Can you change all those links?
There is nothing worse than someone clicking on your link and it not working. You’ll never know if you lost a potential customer thanks to a bad link.
#1 Protect Your Time
By using link redirection from the start, you can share one link everywhere you want. If it changes in the future, you tell that same link to redirect somewhere else. Simple!
Two Free Ways to Redirect Your Links
There are two ways to redirect your links on WordPress: With a plug-in or without. I’ll show you both:
How to Redirect With A Plugin
There are a lot of plug-ins that make it simple to redirect your links. Often paid SEO plug-ins will provide redirect tools (like AIOSEO).
The two best options I have found are ThirstyAffiliates and PrettyLinks. I’ll show you how it works with Pretty Links:
Step 1 - Install and Activate Pretty Links
Search for the Pretty Links plug-in on WordPress. Install and activate.
Step 2 - Add your Redirects
In the Pretty links panel, select “add new” and enter in all your information! Name the link something that will help you track it and be sure to include a directory name in your pretty URL. Common directories are /go/ or /recommends/.
I use /go/ in my example:
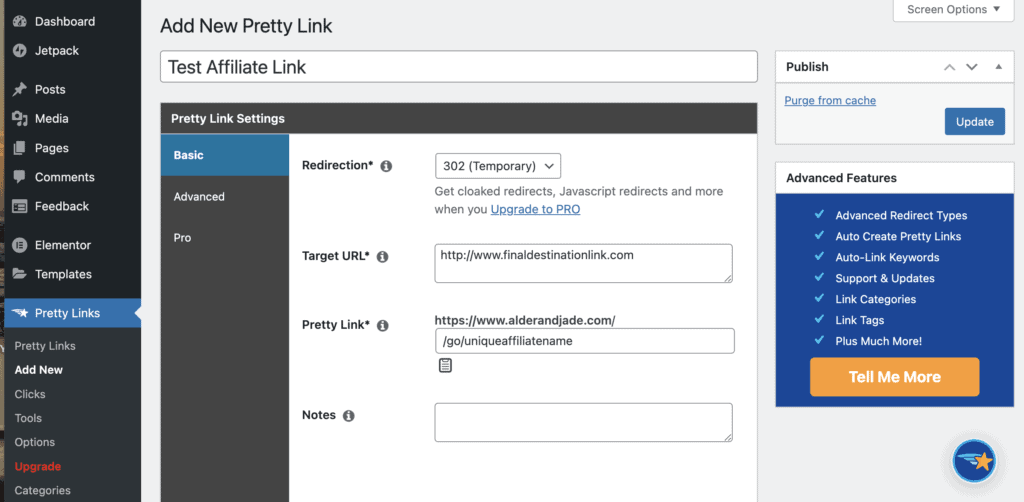
Step 3 - Select Update to Publish
Once published, your link is active! You can always edit it within the Pretty Links panel. You can also copy your new Pretty Link from the panel whenever you need it.
And that’s it!
How to Redirect Without a Plug-In
While I prefer using a plug-in, redirecting without is simpler than it sounds. You are going to edit two files in your WordPress directory. One you only edit once. The other you’ll update anytime you need to add or change a redirect:
Step One - Name Your Directory
/go/ and /recommends/. In the end, you link will be www.yourdomain/directory/uniqueaffiliatename 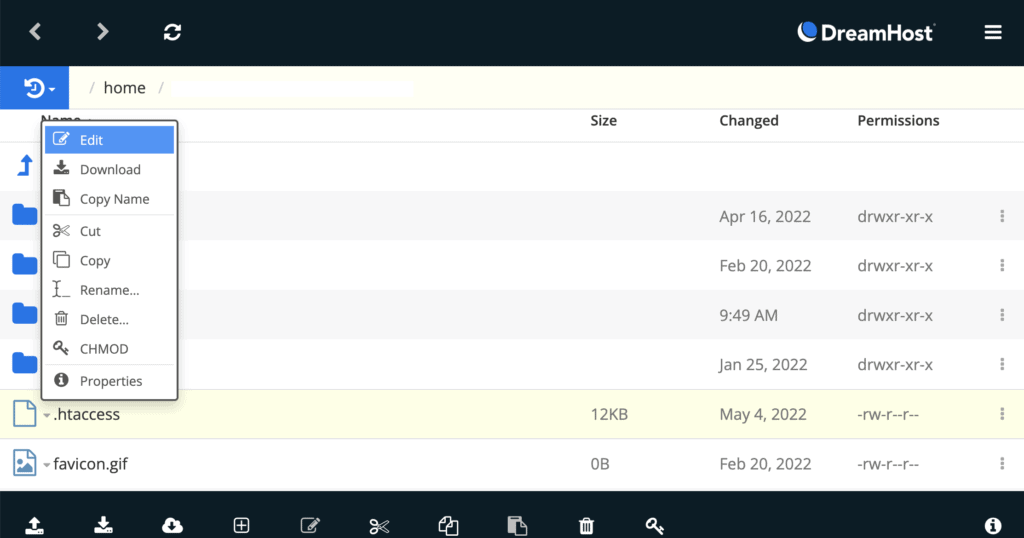
Step Two - Prepare your Redirects
Type up all your redirects for your .htaccess file. I like to enter them in alphabetical order with labels so I can find them later.
Here’s the format you’ll follow:
#Affiliate Name and/or Notes
Redirect 302 /directory/uniqueaffiliatename http://www.finaldestinationlink.com
Here’s an example using the /go/ directory:
#Helium10 Freedom Academy
Redirect 302 /go/H10Freedom https://pages.helium10.com/aff-freedom-ticket?crsh_reqid=3837741
Once I add the above code to my .htaaccess file, it will make https://www.alderandjade.com/go/H10Freedom redirect to that long affiliate link.
Step 3 - Add your Redirects to .htaccess
Your .htaccess file will be in your WordPress base directory that you can access using WebFTP or an FTP client. Or many SEO plug-ins (like All-in-One SEO) will let you access these within your WordPress dashboard:
Download a copy first! In case something goes wrong, you’ll want a back-up.
Open it up, scroll to the bottom and add your redirects. I’d add them within noted brackets. Like:
## BEGIN Affiliate Links
[add all your links here!]
## END Affiliate Links
FYI – The browser ignores anything that starts with # in .htaccess. So you can add as many notes as you want as long as those lines start with #.
Step 4 - Prevent Affiliate Link Indexing
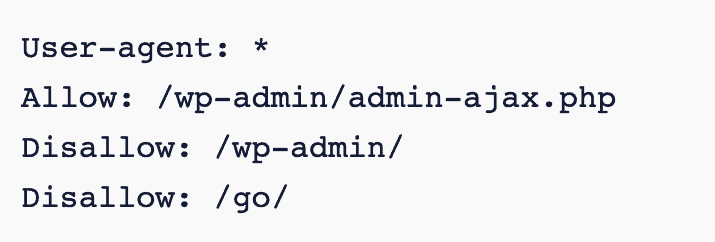
You only have to do this once. Open your robots.txt file and add:
Disallow: /directory/
(*directory should be your chosen directory like /go/ or recommended)
Your robots.txt file should be in the same directory as .htaccess. But SEO plug-ins can hide it. If found mine under tools in my AIOSEO plug-in panel in WordPress.
Step 5 - Put your New Links Wherever!
Keep a list of all the redirect links you created so you can copy and paste them as needed without having to check .htaccess. If any of the URLs change in the future, change the redirect once in .htaccess and everything will redirect to that new URL.
Why I Prefer Pretty Links
Not only is it super easy to set-up and manage, it also tracks my clicks! In the Pretty Links panel, you can see all the data on clicks. You get the timestamp, IP address, location of the pretty link that was clicked on, and more. It gives you a graph of daily clicks and you can build customized reports.
I started by building everything out in .htaccess. Then I realized I’d have to figure out how to track those links too. That’s when I switched to Pretty Links.
What are 301, 302, and 307 Status Codes?
These are the most common redirect status codes that you’ll come across in WordPress. Here’s a simplified breakdown:
301 – Use this when permanently redirecting URL A to URL B. Best for replacing an internal page. If that old page had SEO ranking or backlinks, redirecting it to a new page will send all that SEO “juice” to the new page. It is NOT for affiliate links.
302 – Best pick for affiliate links, 302 is a rather vague status code. It’s saying that the redirect is temporary, but isn’t clear on when it may change again.
307 – Another temporary redirect, but this code says the redirect is very temporary. This is for page maintenance or other quick jobs. Use it when you want to send people somewhere else until you complete your work.
Best SEO Practices with All External Links
Whether it is a redirect or a reference to something outside of your website. There are two things you should always do with your external links:
Make it a NoFollow Link
You don’t want to send your SEO “juice” to external links. Without “nofollow,” search engines will spread some of your SEO ranking over to the linked page.
If you are using standard affiliate links in your blog, you’ll want to be sure each link is a “nofollow.” Most page builders (like Elementor) have this as a checkbox when you add the link.
If you are using Pretty Links, your links in your blog posts are still internal so you don’t need to set them as “nofollow.” Instead, Pretty Links will automatically have the redirect be a nofollow for you!
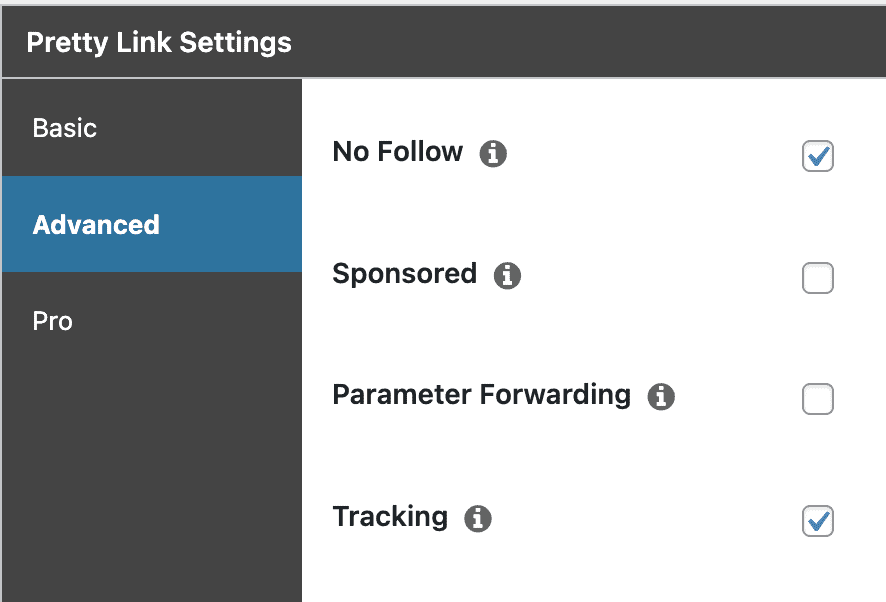
Make it Open in a Blank Page
One of the components of SEO is how long people spend on your site. If they leave your site when they click on a link, that reduces the time spent at your site and they may not return.
By opening the external link in a new tab, your page is still open. This gives more open time on your site and increases the chances of that visitor returning to your page.
To Sum It Up
Use a redirect URL for all your affiliate links from the start. It will make you look more professional and save you a great deal of time and stress down the line.
A simple WordPress plug-in like Pretty Links is an excellent option. Make sure each link is a nofollow link that opens in a blank page to protect your SEO ranking. You can use Pretty Links for free or level up with the pro version of Pretty Links.
If you haven’t started your WordPress website, what’s stopping you?


